7.29.2008

Dessert Drought


Ok...Ok...I know it has been like a week since I've posted anything but I've been on vacation. Really. My husband, who had gotten used to our constantly having desserts in the house has started complaining about the lack thereof. I keep reassuing him that "No, I haven't already given up on my quest to domesticate myself and become a master dessert-maker, I'm just taking a couple days off." I have a list of desserts I have planned on making all week but I just haven't found the time. Ok, the truth is that I am out of butter and I just haven't wanted to run to the grocery store. Coming back from vacation is kind of depressing so I just haven't mustered the energy. I also ate about 3000 calories a day in desserts alone while I was on vacation so I thought a week haitus might be good for me. I am having dinner with girlfriends tonight so its a no-go tonight but I promise to whip up something yummy tomorrow! I'm thinking about making my mom's fabulous homemade banana pudding. I think the recipe comes from some great-aunt of mine. Regardless, it is sooo good. You will never want to eat store-bought pudding again after you see and try this recipe. It is a completely different texture and taste than regular pudding. I used to always request my mom's banana pudding for my birthday instead of a cake. Yes, it's that good. Ok, I've put it out there...and I'm craving it...now I have to make it.
By the way, did you know that there is a website called http://www.banana.com/. It has everything you need to know (and didn't even know you needed to know) about bananas. It has recipes, instructions on how to grow bananas and the history of bananas (which apparently dates all the way back to 6th century BCE). Kind of interesting stuff.

I learned that the banana plant is not a tree. It is the world's largest herb!!! Who would have thought?

7.22.2008

Searching for Perfection: Part 3 - Chocolate Chip Oatmeal Cookie Bars


I said last week that I was in search of a great chocolate chip cookie recipe. I solicited recipe ideas and my goal was to find a good recipe and run with it, adding my own variations and making adjustments as I felt like it. Well, I started with a great cookie recipe and made slight changes to make it better (see post below). I then made that recipe better by adding ice cream. Yummy! Just when I thought I couldn't make it any better, I did. I added oatmeal, more chocolate chips and made a flat pan of chocolate chip oatmeal bars.

My husband said they were like a delicacy. He said they tasted expensive. I think that means he liked them! He's been eating them with ice cream on top!


Chocolate Chip Oatmeal Bars

Ingredients:
1 3/4 cups all-purpose flour
1 teaspoon baking soda
1/2 teaspoon salt (optional)
1 1/4 cups packed brown sugar
1 cup (2 sticks) butter or margarine, softened
1/2 cup granulated sugar
2 large eggs
2 tablespoons milk
4 teaspoons pure mexican vanilla
2 cups quick or old-fashioned oats
2 cups semi-sweet morsels (I used Hershey's chocolate chips)

Directions:

PREHEAT oven to 375° F.

COMBINE flour, baking soda and salt in small bowl. Beat brown sugar, butter and granulated sugar in large mixer bowl until creamy. Beat in eggs, milk and vanilla. Gradually beat in flour mixture. Stir in oats and morsels; mix well.

Spread out entire mixture evenly onto ungreased baking sheet.


BAKE for 9 to 10 minutes for chewy cookies or 12 to 13 minutes for crispy cookies. Cool on baking sheets for 1 minute; remove to wire racks to cool completely.


This should satisfy my chocolate chip cravings for a while. I'm heading to New Braunfels for va-cay for the rest of the week but look for some different desserts next week. I promise...no more chocolate chips for a while!

7.18.2008

Searching for Perfection: Part 2 - Chocolate Chip Cookie Ice Cream Sandwiches


As I lay awake thinking about how good my chocolate chip cookies were I couldn't help but wonder how I could make them any better. I know there were different recipes I could try but I still had a whole batch (ok, well half a batch...I have eaten quite a few of them) of cookies that I didn't want to go to waste. Then it hit me, I could make an ice cream sandwhich out of them! I've seen it done before but I had not had one in forever and I certainly had never made one myself. It couldn't be too hard, right? All I needed to do was throw some ice cream in between 2 cookies and I had an ice cream sandwhich, right?

Here's what I did: I first put several of the cookies in the freezer (for about 10 minutes) so that they would be harder and the ice cream would spread on easily. Second, I choose my ice cream. I figured that I couldn't go wrong with Blue Bell Homemade Vanilla Ice Cream (I mean really...does it really get any better?) so I put some in a bowl and mixed chocolate chips in it (I was totally channeling Marble Slab...but without the marble slab...and without the metal scoops to bang around on the slab.) After mixing the ice cream and chocolate chips I got my cookies out of the freezer and spread the ice cream on top of one cookie and then firmly pressed another cookie on top of it. I then rolled the cookies (the sides of the cookies) in chocolate chips to add more. I then promptly (because the ice cream was quickly starting to melt) placed the cookie sandwiches back in the freezer. They were hardened and ready to eat in about 10 minutes.

This is a great way to use leftover cookies!


Here's some pictures!


7.17.2008

Chocolate Chip Cookies...Searching for perfection: Part 1


On my quest to find the perfect chocolate chip cookie I plan to try out many recipes. Last night I tried my first and it was a success. The cookies are awesome. I had my friends Jennifer and Kasey as tasters and they both raved about how yummy they were. I was proud of myself.

After reviewing about a dozen recipes I decided to start out easy. I mentioned in my previous post that a friend recommended the Nestle Toll House recipe on the back of their bag of chocolate chips. I thought this was a good place to start so I took the recipe and made a couple of minor changes. First, I used Hershey's chocolate chips instead of Nestles'. I know...I know...it's the Nestle recipe but I was told (by a chocolate lover) that Hershey's has better tasting chocolate so I had to defer to her expertise. Second, I used Pure Mexican Vanilla that my mother recently brought back from her trip to Mexico. Pure Mexican Vanilla comes from Mexican vanilla beans and means that nothing has been added or taken away from the bean. My mom always cooks with Mexican Vanilla and I think it adds a distinct vanilla flavor to any dessert. Third, (because I love vanilla) I added 3 times the required tsp in the recipe. I had read that this gives them a stronger aroma and just makes for an all around better cookie. Fourth, the recipe calls for nuts and I'm not a big fan of nuts in my cookies so I didn't include them. Although I plan on trying several more recipes, this is definitely one I will continue to make over and over. I may try some additional variations but it's a great recipe to start with.

Here's the result. Yummy!


What you don't know is that there almost were no cookies at all because my friend Jennifer and I couldn't stop eating the batter. It was sooo good...


Chocolate Chip Cookies:

Ingredients:
2 1/4 cups all-purpose flour
1 teaspoon baking soda
1 teaspoon salt
1 cup (2 sticks) butter, softened
3/4 cup granulated sugar
3/4 cup packed brown sugar
3 teaspoons pure mexican vanilla
2 large eggs
2 cups (12-oz. pkg.) Hershey's semi-sweet chocolate chips

Directions:
PREHEAT oven to 375° F.

COMBINE flour, baking soda and salt in small bowl. Beat butter, granulated sugar, brown sugar and vanilla extract in large mixer bowl until creamy. Add eggs, one at a time, beating well after each addition. Gradually beat in flour mixture. Stir in morsels. Drop by rounded tablespoon onto ungreased baking sheets.

BAKE for 9 to 11 minutes or until golden brown. Cool on baking sheets for 2 minutes; remove to wire racks to cool completely.

7.15.2008

Chocolate Chip Cookies - Looking for perfection

Ok, who doesn't love chocolate chip cookies?

I've been obsessed with them lately. Maybe it's because I haven't had a good one in a long time. When I was pregnant my wonderful husband made me 2 chocolate chip cookies (the slice and bake Pillsbury cookie dough ones) every night. How sweet. Even when he didn't want any he would make them for me. I justified needing them because I knew I was supposed to be drinking lots of milk because it was good for the baby. However, I don't like milk unless I have something chocolate-y to go with it. Thus the need for chocolate chip cookies.

I guess this is a good time to mention that before I was pregnant I never even really ate sweets. Don't get me wrong, I would always take a bite of a dessert if someone were to order one after a meal but I never really craved them. I just never really had a sweet tooth. I never understood those people who had to have desserts after every meal...or who always carried a bag of candy in their purse (Kasey :). I just didn't have the craving. I was more of a meat and potatoes girl. I could eat an ultimate cheesburger with chili-cheese fries and still want to share an order of onion rings. I love salty foods. Well, that all changed when I became pregnant. I suddenly had cravings for all things chocolate. I craved chocolate chip cookies, Peanut m&ms, Snickers, brownies and most of all chocolate ice cream.

My FAVORITE ice cream in the world is served at a Houston dessert place called The Chocolate Bar. It's called Creamy Dreamy Chocolate Truffle. It's dark chocolate ice cream with chocolate truffle chunks in it. YUMMY! I drug my husband there several times a week throughout the entire pregnancy. We finally started buying pint-sized containers so we wouldn't have to go back every other day. We went so much that the guy behind the counter actually told us that we should look into purchasing one of the actual tub containers of ice cream. Yes, the ones that they scoop the ice cream out of! I was mortified. I sent Andrew back alone to get my ice cream after that (Again, what a great husband). He said that he would actually hang around the store and wait until the same check-out guy was helping someone else so as to avoid embarrassment. Too funny! All of those who know me also know that I'm a boring orderer. What I mean is that I order the same thing at every restaurant I go to. If I find something I like I always get it. If it ain't broke...ya know?

I digress...the whole point of this post is that I've been craving really good chocolate chip cookies. Now the old me would just run out to the store and buy my Pillsbury cookie dough cookies and be done with it. However, because I'm on a mission to domesticate myself, I figured I should try to make my own homemade chocolate chip cookies. Shouldn't every mom know how to make really good cookies? Isn't that like a requirement for a good mom?

The problem is that I'm pretty picky when it comes to what I like in a chocolate chip cookie. I don't want them too thin but I don't want them thick either. I also do not like crisp cookies. I want them gooey--but not so gooey that they fall apart when you pick them up. Understand? So, I'm on a quest to find the recipe for the perfect chocolate chip cookie (perfect for me anyways).

A friend of mine suggested today that I try out the Nestle Toll House recipe (the one on the chocolate chip package). She said they were her favorite. I may try it out but it seems kind of commercial. I'm looking for something a little different. I want to uncover someone's great-grandmother's recipe that is just out of this world. I am actually planning on making about 3 or 4 batches of cookies this week. My husband's out of town so what else do I have to do?

If you have any good recipes, please send them along. I'd love to try them!

7.13.2008

Traditional Strawberry Shortcake

I don't know what it is but summertime always makes me think of cool desserts. Maybe it is because it is so hot here in Texas (I think it was 98 degrees yesterday....uggg). Regardless, I've been wanting to make a cool refreshing dessert. I wanted to do something with fruit and berries but I kept coming back to cobblers and pies. Although I love myself some hot berry cobbler it still wasn't exactly what I wanted. After perusing different recipe ideas I came across a great recipe for strawberry shortcake. That's it, I thought! What's more refreshing than strawberry shortcake. In my search for the perfect recipe I discovered that strawberry shortcake is traditionally made with biscuits. Yummy. Who doesn't like biscuits? I personally don't really enjoy sponge-type cakes so I was really excited about making a good dessert even better. It also gave me an excuse to try my hand at making homemade biscuits. I found a great biscuit recipe (which I varied a little) on http://www.homesicktexan.blogspot.com/. So I had it. I was going to make homemade biscuits, homemade whipped cream and top with fresh strawberries.

The recipe also made me a little nostalgic. When we were little my Granddad would call biscuits "cat heads." It always made us laugh and I thought he must have made it up to be silly. Well, when I was reviewing biscuit recipes I discovered that a "cat head" biscuit is actually a name for a biscuit where the dough was "dropped" on to the pan (as opposed to using a biscuit cutter to shape the biscuits). It's also because the biscuits are supposed to be as big as a cat's head. In the spirit of childhood memories I decided to make "cat head" biscuits.


Homemade Biscuits:

Ingredients:
Two cups of flour
1 tablespoon of baking powder
1 teaspoon of sugar (can add more to taste)
1/2 teaspoon of salt
1 stick of butter, cold (8 tablespoons)
3/4 cup of buttermilk


Directions:
1. Preheat the oven to 450 degrees.
2. Mix all the dry ingredients together. Cut the stick of butter into pieces, and work into the flour mixture with your hands or a pastry blender until it resembles pea-sized crumbs.
3. Add the liquid, mixing until a bit loose and sticky. Pour dough out on a floured surface, and knead for a couple of minutes. Dough should be smooth and no longer wet. You can sprinkle more flour on the surface if you find it’s sticking (I had to keep adding flour).
4. Roll out dough until it’s 1/4 of an inch thick, and then fold it in half.
5. Using a round cutter (can use a glass or a cup if don’t have a biscuit cutter) cut out your biscuits from folded dough. To make "cat head" biscuits, after kneading dough, just scoop dough and drop on to pan. Shape as you please (I actually folded dough and shaped edges).
6. Place on a greased baking sheet close together (so they rise up not out), and bake for 15 minutes or until the tops are golden brown. Makes 10-12 biscuits.


Strawberry shortcake
Ingredients:
2 pints of strawberries, rinsed, hulled and quartered
1/4 cup of sugar
1 cup heavy whipping cream
1 teaspoon of vanilla
2 tablespoons of honey

Directions:
1. Toss the strawberries with the sugar in a bowl, and leave out at room temperature for a couple of hours, stirring occasionally.
2. Pour the cream into a chilled bowl, and whip with either a whisk, eggbeater or mixer until thickened (be careful to not whip it too much or you’ll turn it into butter!).
Gently stir in the vanilla. Cover and chill until ready to use (though if it sits too long it will revert back to its liquid state and will need to be whipped again). Optional: My mom said that she adds sugar to her cream to make it sweeter. I chose not to do it this time but I'm sure it makes for a sweeter cream.
3. Cut each biscuit in half, and on the bottom half place some strawberries and whipped cream. Put the top half on and add some more berries and cream.
4. Drizzle with honey and serve!


Results: The recipe was actually pretty easy. The only problem was that I made the biscuits on Friday and didn't make the rest until Sunday. By Sunday, the biscuits were a little dry. I will need to make some adjustments next time. I was worried about the dessert turning out ok so I also made a batch up backup brownies. We ended up eating both!

7.10.2008

Dessert Flirt proudly presents: Baking with Lara!

Since I will only be making 1 dessert a week (at least for now) I thought it a good idea to include great dessert recipes from other people who make great desserts. Thus, Dessert Flirt proudly presents Baking with Lara! Lara is a friend of mine who makes really good desserts. Really, they are quite impressive. What's more impressive is that she is a 20-year-old college student. When I was in college I think the only dessert I ever "made" was heating up a Chips Ahoy cookie in the microwave. I did have to perfect the heating times (was 10 seconds too short? was 30 seconds too long???) so it did require some sort of thinking :) However, I definitely did not have the baking skills that Lara has. I will be occasionally posting her "guest" recipes so definitely check them out when I do!

Here's Lara...


Here are the two desserts she made for the 4th of July....

LIGHTER THAN AIR CAKE


PREP TIME
30 Min
COOK TIME
25 Min
READY IN
9 Hrs 55 Min

INGREDIENTS
· 1 (18.25 ounce) package yellow cake mix
· 8 ounces cream cheese
· 1 1/2 cups confectioners' sugar
· 1 (20 ounce) can crushed pineapple with juice
· 2 (8 ounce) cans mandarin oranges, drained
· 1 (3.5 ounce) package instant vanilla pudding mix
· 1 (8 ounce) container frozen whipped topping, thawed

DIRECTIONS
1. Mix and bake cake mix as per package instruction for two 8 or 9 inch round layers. Let layers cool, and then split each layer in half so as to have 4 layers.
2. In a large bowl, whip cream cheese until soft, and then gradually mix in confectioners' sugar. Stir in the pineapple with juice and the drained mandarin oranges, reserving about 5 mandarin orange slices to decorate the top of cake. Mix in the dry pudding mix. Fold in the whipped topping.
3. Place one cake layer on a cake plate cut side up; spread with frosting. Place another layer cut side down on the first one, and top with more frosting. Repeat until all layers are used, spreading last bit of frosting on top and sides of cake. Decorate with reserved mandarin orange slices. Refrigerate overnight before serving.


CARROT CAKE WITH COCONUT ICING


CARROT CAKE INGREDIENTS
· 2 1/3 cups all-purpose flour
· 1 tablespoon baking powder
· 1 teaspoon baking soda
· ¾ teaspoon salt
· 2 teaspoons ground cinnamon
· ½ teaspoon ground or freshly grated nutmeg
· 1 cup pineapple juice
· ½ cup canola oil
· ¾ cup sugar
· ½ cup pure maple syrup
· 2 teaspoons vanilla extract
· 1 cup macadamia nuts, roughly chopped (I used walnuts instead)
· ¼ cup crystallized ginger, chopped (I didn’t find this, so I used 1 teaspoon of ground ginger)
· 1 cup unsweetened shredded coconut
· 2 cups carrots, grated

DIRECTIONS
1. Preheat oven to 350 degrees F. Have ready two 8-inch round spring form cake pans, lightly greased.
2. In a large bowl, sift together the flour, baking powder, baking soda, salt and ground spices.
3. In a separate mixing bowl, mix together the pineapple, oil, sugar, maple syrup, and vanilla. Add the dry ingredients to the wet in batches, and combine well with a hand mixer. Fold in the macadamias (or walnuts), ginger, coconut, and carrots.
4. Divide batter evenly between the two round cake pans, and bake for 40 to 45 minutes.
5. Let cool in pans, then remove from pans and put a layer of coconut icing between the layers, and another layer of coconut icing on top.

COCONUT ICING INGREDIENTS
· ¼ cup nonhydrogenated margarine at room temperature
· ¼ cup coconut milk
· 1 teaspoon vanilla extract
· 2 cups confectioners’ sugar, sifted
· 1 cup unsweetened coconut

DIRECTIONS
1. Cream the margarine until light and fluffy. Add the coconut milk and vanilla and combine. Add the sifted confectioners’ sugar and mix until smooth. Add the unsweetened coconut and combine. Refrigerate until ready to use.

7.08.2008

Review: Crave Cupcakes - A great addition to Houston!

Yesterday I mentioned a new bakery in Houston called Crave Cupcakes (http://cravecupcakes.com/) and said that I hoped I could try it out soon. Well, I couldn't wait so I rushed over there right after work. I even woke up my sleeping baby from a nap to go (something I have never done in his 4 months of life). After reading all about it I just really really wanted a cupcake! I also mentioned that the reviews had been mixed. Some people loved it, some peopled didn't and I wanted to check it out for myself. Well, I am here to tell you that I thought the cupcakes were FABULOUS!

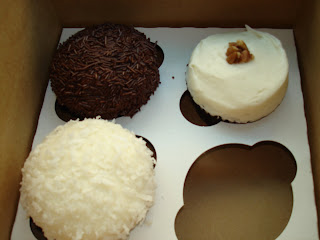
I tried the strawberry, dark chocolate and hummingbird. Here's a picture.


After purchasing the cupcakes I immediately had to taste each of the icings and did so in my car! My personal favorite was the strawberry! The icing is made from pureed strawberries. Yummy! The dark chocolate was also very good. It was really rich. I haven't tried the Hummingbird (some sort of banana nut bread with pineapple and cream cheese icing) yet but if it is anything like the other two it will be delicious. I plan on having it today.

My friend and nanny Jennifer also made a purchase. She picked lemon coconut, dark chocolate and Hummingbird. Here's her box.


She loved the lemon coconut and described the cupcakes as having the "perfect cupcake/icing ratio." Her mother (for whom she bought the dark chocolate) said they were "awesome!"

The bakery itself was really cool. It had a modern/retro thing going on and the staff was very friendly. I will definitely be returning!

7.07.2008

Crave Cupcakes - Houston


I was doing some shopping this holiday weekend when I drove past a new bakery called Crave Cupcakes. The bakery was located in Uptown Park (for those in Houston). The store front was enticing but I was in a hurry and unable to drop in. I was excited about learning more so I tried to look them up once I returned home and I couldn't find a website. It seems as though there is already a similar cupcake bakery in Canada named Crave Cupcakes (see http://www.cravecupcakes.ca/) (Their menu looks delicious by the way.) but this is not the same company.
Although I couldn't find a website I did find some other sites that discussed/reviewed the new bakery.

The blog Cupcakes Take the Cake posted a description and review of Crave Cupcakes by the Houston Press blog Eating Our Words.
The designer cupcakes ($3.50 each) are made fresh each day starting at 5 a.m. Leftovers are given to charity or tossed. Doors open at 8 for the breakfast variety. Milk, sugar cane sodas and brewed-by-the-cup fresh ground coffee are also available. Cupcakes can be special-ordered a day in advance.
Owners Brad Dorsey (with restaurant experience) and the husband and wife filmmaker team of Elizabeth Harrison and Peter Cooper set up shop here because Harrison always wanted to do a bakery and they all wanted to do it in their hometowns of Houston.The sign at the front promises European chocolates and Madagascar bourbon vanilla, among other mouth-watering ingredients. Dorsey says they are in the process of finding their feet now, rotating different flavors each day but so far those with chocolate in them seems to be winning. Red Velvet – how Texas – was a sellout the day we were in.
At the bottom of the post were several comments from those who have stopped by. It seems that the reviews are mixed. Some love it...some don't. I'd love to hear from anyone who has been!
I will hopefully be able to stop by myself sometime soon.

7.05.2008

Apple Dumplings

I had planned to make a pie or cobbler for the 4th of July but I came across a family recipe for apple dumplings and I couldn't resist. I made a mess in the kitchen (flour everywhere!) but the dumplings were a success!


Recipe:

Ingredients for Dumpling Pastry:
2 cups flour
1 tsp salt
2/3 cup shortening
1/2 cup water
1 stick of butter

Directions:
Mix together flour and salt
Cut in shortening, sprinkle with water and mix lightly with a fork until moistened.
Gather together with fingers.

Roll out a little less than 1/8'' thick and cut into 7'' squares.
Slice medium tart juicy apple for each dumpling (I used small granny smith apples and they worked great!)
Place apples on squares. Pour sugar and cinnamon mix over each (mix = 1/2 cup sugar & 1 1/2 tsp cinnamon)
Fold dough & dot with 1 tbsp butter on top.

Directions for Syrup (to drizzle on top):
Boil together 3 minutes 1 cup sugar, 2 cups water, 3 tbsp butter, 1 tsp cinnamon
Drizzle syrup over each dumpling before placing in oven and halfway through baking.

Bake immediately 40-45 minutes or until crust is brown and apples are cooked through.

Drizzle syrup over dumplings.

Serve warm.

(I served them with vanilla ice cream! Definitely recommended!)

Hot out of the oven....


7.03.2008

4th of July!!!

How fun to have a holiday to celebrate my first dessert! I haven't decided what I am going to make yet but I have to try something all-american. I'm thinking an apple pie or maybe a cobbler.


Here is the recipe for the Sour Cream Apple Pie I was planning on making. I will definitely be making it soon.

Sour Cream Apple Pie

INGREDIENTS
2 tablespoons all-purpose flour
1/4 teaspoon salt
3/4 cup white sugar
1/4 teaspoon ground nutmeg
1 egg
1 cup sour cream
1 teaspoon vanilla extract
3 cups apples, peeled and chopped
1 recipe pastry for a 9 inch single crust pie
1/3 cup white sugar
1/3 cup all-purpose flour
1 teaspoon ground cinnamon
2 tablespoons butter

DIRECTIONS
1. Stir together 2 tablespoons flour, salt, 3/4 cup sugar and nutmeg in bowl. Combine egg, sour cream and vanilla in another bowl; mix well. Add egg mixture to dry ingredients; mix well. Stir in apples and spoon mixture into unbaked pie shell.
2. Bake in a preheated 400 degree F (205 degrees C) oven 15 minutes.
3. Reduce temperature to 350 degrees F (175 degrees C) and bake 30 minutes more. Remove pie from oven. Increase temperature to 400 degree F (205 degrees C).
4. Prepare cinnamon topping and sprinkle over pie. Return to oven and bake 10 minutes more. Cool on rack.
5. To Make Cinnamon Topping: Combine 1/3 cup sugar, 1/3 cup flour and 1 teaspoon ground cinnamon in bowl. Cut in 2 tablespoons butter or regular margarine until crumbly, using a pastry blender.